


I won't kid you there is some work involved, but once you do a few you will be thinking up all sorts of ways to use them. A supply list can be found at the end of this post.


The two most important tools are good dust masks and safety glasses.

My safety glasses are by "WileyX". They have foam padding making them pretty comfortable and interchangeable lenses to turn them into safety sunglasses In addition to meeting ANSI specs they have a military ballistic impact rating. True, way more then you need for this project, but I liked that extra rating and since we used to sell this style at work figured why not.

A dust mask is essential Metal dust is extremely dangerous.

A vice for holding the knife steady while cutting.

Hacksaw

Using the hacksaw saw off the blade
OR

If you have one; a band saw outfitted with metal cutting blade.
My sweetie found this little one for me at a flea market.
(Such a romantic)

Once the handle is cut put on some work gloves and use coarse sand paper to smooth away the sharp edges.
You can also use a dremel with a grinding attachment and then finish with a sandpaper bit.
Now drill a hole in just one side with a drill outfitted with a small bit. Be careful to drill only
through one side of the vase. A dremel will work for this too.

(an order in the works from a client for her neighbors)
Attach a little suction cup, fill with a small amount of water and add a small bloom.
Attach an ornament hook and viola!

Imagine fresh flowers on your holiday tree.
I'm thinking baby's breath would look lovely with our shell ornaments
You can dress them up too.
You can dress them up too.
Find some wood coffee stirrers or Popsicle sticks and cut them down.
These are old clip back earrings. Just snap it on to the stick


For a beach look glue on a small sand dollar or shell.

You can also attach little signs to the sticks
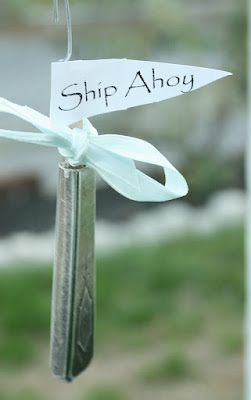
Great as a small hostess or teachers gift.
Add a few sprigs of dried lavender, slip vase into a cello bag and tie with a pretty ribbon.
If you would like to make your own a supply list is below.
Or you can purchase one from my Etsy shop
Supplies List

Great as a small hostess or teachers gift.
Add a few sprigs of dried lavender, slip vase into a cello bag and tie with a pretty ribbon.
If you would like to make your own a supply list is below.
Or you can purchase one from my Etsy shop
Supplies List
- Silver plated hollow handled knife. "Grille" style knives work best. Grille style knives have shorter blades and longer handles
- Safety Glasses. Please don't think about skipping this important measure
- A good dust mask.-Don't skip this one either.
- A table mounted vice.
- Hacksaw or a band saw outfitted with a "metal blade"
- Drill or Dremel for drilling holes
- Gloves
- Coarse Sand Paper or Dremel for smoothing rough edges.
- Suction cup if you would like to hang on a mirror, window or vase.
- Wire, ornament hooks, ribbon or twine to hang on a chandelier or tree.


27 comments:
Is there no end to your wonderfully creative mind??? I just got my stamped silverware and I died when I saw the very special lemon fork you sent me the tongs are so beautifully twisted almost like a barley twist. I am going to really enjoy these during the Holidays and all year long, Thank you so much for sharing your talents with us, Kathysue
I love making things with the old silver....
These are precious! Thanks for all the how to info and great pics!
have a blessed Thanksgiving!
Tammy :-)
JUNK WILD
Rita, you are amazing!!
You continually come up with the best ideas!!
How do you do it?
These are wonderful, I actually have a couple broken knives right now just waiting to be transformed!!!
Do you ever sleep, I swear your mind never stops creating... does it?
Lots of Love my sweet friend!
XO
Beautiful Rita,
This is exactly How I make mine, they are a lot easier when the knife end is not packed with that solid plaster stuff :) and if they do you have to do a whole lot of digging out to hollow out the ends. I hope your where fortunate enough to get knives that were less troubling to work with. :)
I am leaving the flatware projects to the pro...Yep I am talking about you my girl! You bring new meaning to a sterling Rose vase.
I just love that they act as Christmas tree ornaments, beautiful!!
See you soon girl, I am more than ever in the mood to finish up my altered table top tree so I can than bring a little festive holiday to my place :)
Keep inspiring your beauty.
xoxo
Dore
These are really cute, Rita~ thanks for the tutorial!
What a cute idea. Never under estimate a creative woman with power tools.
Take good care,
Karen
What a very cute idea! Everytime I go thrifting I keep an eye out for sterling silverware for you:)
ps....i'm hoping to make it to the beach this weekend for driftwood!!!! When I get some I will be listing the jewelry stands in my shop:)
I'll keep you posted!
You are so clever! They are really sweet on the tree
they are all so adorable!!!!! Love them!
No kidding! Who knew you could make vases from silverware! You are a genius...what charming accoutrements. But I won't be making them anytime soon! Better that I go off to your Etsy shop.:)
I love your creative style! I'm looking for code to add your button to my blog but it shows that box empty.
Give me your hand...I just kissed it! You talented, crafty, creative woman! I'm so glad you're in the world, and making stuff so I can buy it. I can't wait to give my mom and sister their handcrafted spoons as that added special touch to their Christmas gifts. :)
Beautiful and so creative!
Over from Reasonably Chubby.
These are SO pretty!!
Pearl
HI Rita
You're so kind to share this clever clever tutorial with us... but sadly I don't have all the equipment... I also think better to buy from the expert!! hehe You're etsy shop!!!
Have a lovely week... congrats on your wares being publicized!!! ciao xxx Julie
How in the world do you think of something like these??? It's just amazing how creative you are, I wish I have half your creativity! I love this idea a lot, especially when you added the rose buds, or the earrings. Perfect as an ornament. But since I don't have all those tools, I'd rather buy them from you :) I need to start with Christmas shopping...after Thanksgiving.
Happy Thanksgiving Rita!
-marie
I LOVE mine!!!!!! and I use it almost everyday since I've stuck it on my kitchen window. When the bloom I have in it dies, I just go pick another!! And now you've given me the idea to use it as a Christmas ornament too!!!!
Have a very Happy Thanksgiving....eat lots too!!
These are amazing! You are extremely talented and creative! I can just imagine all the sparkle on the tree with these beauties!!
Have a wonderful Thanksgiving!!
The ornaments are brilliant..., what a creative way to add bling to the tree!!
Happy Thankgiving, Rita!!! And I'll be including your spoons to my very long list of fabulous gift ideas that I will post this weekend!
What an absolutely clever idea, Rita - and sooo cute! They look great on that tree! Thanks for the tutorial!
Have a blessed Thanksgiving!
xoxo laurie
Oh these are so cute, I really love the ones with all the sparkles on top. What a great idea for Xmas decor :D
Xoxo
Sarah
This looks like an amazing idea!I love it! I love the idea of the fact that ou can make it with your own hands. :-)))
Wishing you wonderful Thanksgiving weekend, the last in November! I can not believe that Fall is gone, but the fact that the Christmas is almost here makes it OK!:-)
Good morning,
talented girl!
THIS is why they
pay you the big
bucks for your
beautiful work ~
There is a lot
involved. You
truly have the
touch....
xx Suzanne
cool!
These are really neat! I added your ETSY shop to my favorites! Thanks! ♥
What a terrific idea! I love your blog by the way. And you're giving me some good ideas for my daughter's beach themed bedroom!
Megs :)
Hi Rita-
These are so pretty and cute. How clever! I love the one with the jewels. They are the perfect gift.
Want to wish you a Merry Christmas and think your brown and white packages must look very pretty.
My best- Diane
Post a Comment
Thanks for stopping by.